> ## Documentation Index
> Fetch the complete documentation index at: https://help.mercury360.com/llms.txt
> Use this file to discover all available pages before exploring further.
# Add Users
> Create user accounts, assign system and module roles, and send invitations to bring new teammates into your Mercury workspace.
Add a user when you want to bring a new teammate into your Mercury workspace. The flow is short — enter their details, pick a system role, assign module access, and send the invite.
Users you add **don't get access immediately**. They receive an email invitation and become Active only after accepting it.
## What adding a user does
* Creates the user account in your organization
* Assigns a **system role** that defines overall access scope
* Grants **module-level access** (e.g., Recruit) with a specific module role
* Sends an **email invitation** to activate the account
## How to add a user
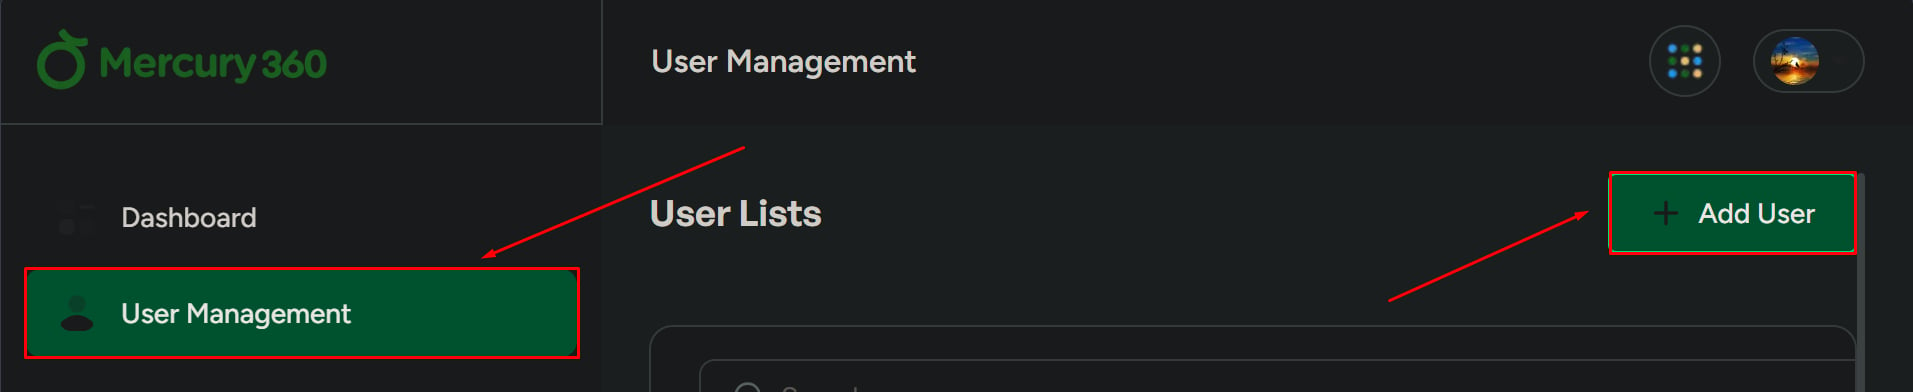 From the left navigation panel, click **User Management**.
A pop-up form opens on the right side of the screen.
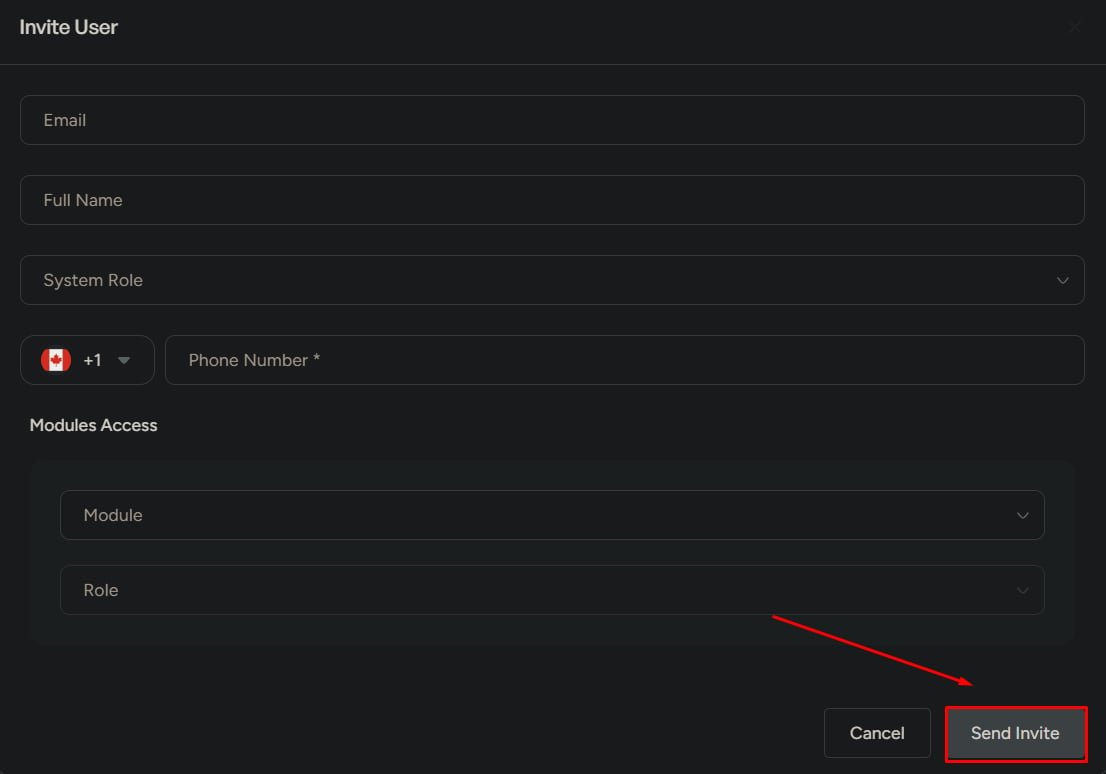
Fill in the basic profile information:
| Field | Required | Notes |
| ----------------- | -------- | ------------------------------------------------- |
| **Email address** | Yes | Becomes the login — use a valid, accessible inbox |
| **Full name** | Yes | Appears in the user list and on shared activity |
| **Phone number** | Optional | Used for account recovery and notifications |
Pick one role that defines the user's overall scope. (See [System roles](#system-roles) below.)
Select the module (e.g., **Recruit**) and choose a **module role**. The module role determines what they can do *inside* that product.
Click **Send Invite**. The user receives an email and must accept it to activate their account.
## System roles
System roles control a user's **overall access level** across your organization. Pick exactly one per user.
Full system access. Can manage users, billing, integrations, and organization settings.
Limited access based on the modules and module roles assigned to them.
Restricted access with minimal permissions — ideal for occasional collaborators.
Reserve **Organization Admin** for people who genuinely need to manage billing, users, or org-wide settings. Everyone else should be a Standard or Limited User.
## Module roles
Module roles control what a user can do **inside a specific product** like Mercury Recruit. Common module roles include:
| Module role | Typical use |
| ------------------------- | ----------------------------------------------------------- |
| **Recruit Admin** | Configure the module, manage all jobs, and adjust workflows |
| **Recruit Manager** | Own hiring for a department, approve jobs and offers |
| **Recruiter** | Source, screen, and move candidates through the pipeline |
| **Interviewer** | Review assigned candidates and submit scorecards |
| **External Collaborator** | Limited, scoped access — ideal for agencies or clients |
## Before you click Send Invite
Confirm:
* The email address is correct
* The system role matches the user’s responsibility
* Module access is assigned correctly
* The user should receive the invite now
## What happens after you invite
The user's status follows a simple lifecycle:
The invitation has been **sent**, but the user **hasn't accepted yet**. They can't log in.
The user has **accepted the invite**. They can log in and use their assigned modules.
The user's access has been **disabled**. They can't log in or use any module.
From the left navigation panel, click **User Management**.
A pop-up form opens on the right side of the screen.
Fill in the basic profile information:
| Field | Required | Notes |
| ----------------- | -------- | ------------------------------------------------- |
| **Email address** | Yes | Becomes the login — use a valid, accessible inbox |
| **Full name** | Yes | Appears in the user list and on shared activity |
| **Phone number** | Optional | Used for account recovery and notifications |
Pick one role that defines the user's overall scope. (See [System roles](#system-roles) below.)
Select the module (e.g., **Recruit**) and choose a **module role**. The module role determines what they can do *inside* that product.
Click **Send Invite**. The user receives an email and must accept it to activate their account.
## System roles
System roles control a user's **overall access level** across your organization. Pick exactly one per user.
Full system access. Can manage users, billing, integrations, and organization settings.
Limited access based on the modules and module roles assigned to them.
Restricted access with minimal permissions — ideal for occasional collaborators.
Reserve **Organization Admin** for people who genuinely need to manage billing, users, or org-wide settings. Everyone else should be a Standard or Limited User.
## Module roles
Module roles control what a user can do **inside a specific product** like Mercury Recruit. Common module roles include:
| Module role | Typical use |
| ------------------------- | ----------------------------------------------------------- |
| **Recruit Admin** | Configure the module, manage all jobs, and adjust workflows |
| **Recruit Manager** | Own hiring for a department, approve jobs and offers |
| **Recruiter** | Source, screen, and move candidates through the pipeline |
| **Interviewer** | Review assigned candidates and submit scorecards |
| **External Collaborator** | Limited, scoped access — ideal for agencies or clients |
## Before you click Send Invite
Confirm:
* The email address is correct
* The system role matches the user’s responsibility
* Module access is assigned correctly
* The user should receive the invite now
## What happens after you invite
The user's status follows a simple lifecycle:
The invitation has been **sent**, but the user **hasn't accepted yet**. They can't log in.
The user has **accepted the invite**. They can log in and use their assigned modules.
The user's access has been **disabled**. They can't log in or use any module.
 ## Next steps
Search, filter, suspend, or reset passwords for users already in your workspace.
Review status types, available actions, and how the module fits into Mercury Accounts.
## Next steps
Search, filter, suspend, or reset passwords for users already in your workspace.
Review status types, available actions, and how the module fits into Mercury Accounts.